Tadalafil zeigt eine konstante Resorption im Gastrointestinaltrakt, mit maximalen Plasmaspiegeln nach rund zwei Stunden. Der Wirkstoff verteilt sich gut im Gewebe und weist eine hohe Plasmaproteinbindung auf. Seine lange Halbwertszeit erlaubt eine verlängerte Wirkphase. Der Metabolismus erfolgt über das hepatische Enzymsystem CYP3A4, mit der Bildung inaktiver Metaboliten. Exkretion geschieht primär über den Stuhl. Die Häufigkeit von Nebenwirkungen steigt mit der Dosis, wobei vor allem vasodilatatorische Effekte dominieren. Ein gängiger Bezugspunkt in pharmakologischen Analysen ist cialis ohne rezept, das mit dieser Wirkstoffklasse assoziiert ist.
Microsoft word - asparagus handout
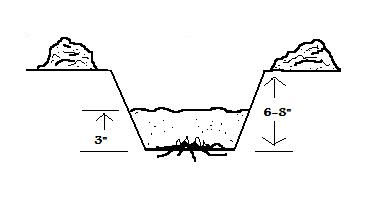
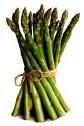
Asparagus & Potatoes Asparagus Soil Preparation- Loosen the soil as deeply as you possibly can. Asparagus likes loose soil and it will also get rid of all surface weeds. The finer you work down your soil the better asparagus you will have. Work compost into the soil and garden fertilizer (Sunnyside Gardens 8-16-8-5). You will get more and thicker spears from a well fertilized bed. Planting- Plant 2 to 4 weeks before the last frost. Set your asparagus roots 1 foot apart in the row and space your rows 2 feet apart. Your furrows or holes for the new roots should be 6-8 inches deep. Spread the roots out evenly in the furrow with the eyes pointing up, completely cover the roots to a depth of 3 inches. Be sure to pack the soil very firmly around the root. This will leave a 3-5 inch trench or hole which you fill in gradually as the plants put on new growth. Using this trenching method; establishes a healthy plant, helps catch necessary
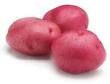
moisture for early growth, and each time you hoe a little more soil into your trench you’re cultivating and killing weeds and grasses which have started. Harvesting- To enable your asparagus bed to become well established and give you good returns for many years, do not harvest any the first year. Cut asparagus sparingly the 2nd year. In following seasons you may cut freely. After harvesting leave some uncut top-growth, to provide for root development. This will help maintain the plants vitality for the next year’s crop. Asparagus should be cut when the spears are 4 to 6 inches high. They should be cut with a sharp knife, an inch below the surface. Maintenance- In very early spring each year, before the asparagus shoots are near the surface of your bed, the ground should be loosened by shallow cultivation or plowing. Remember that asparagus is a heavy feeder and will respond with extra bumper crops if you fertilize it each succeeding year with compost and garden fertilizer (Sunnyside Gardens 8-16-8-5). For both summer and winter months give your bed a top dressing of well composted manure 2 to 3 inches deep. Keep the weeds and grass out of your bed all season long. Your reward will be more asparagus for years to come. Potatoes Soil Preparation- Although potatoes do better than most other food crops in poor soils, yields will be significantly higher in a well-drained and loose soil which is high in organic matter such as compost or soil pep.
Phosphorus and potassium are essential for good potato development. We recommend using Sunnyside Garden’s 8-16-8-5 garden fertilizer. Watch the PH, as high PH (alkalinity) can cause scab on potatoes. Purchasing Seed- As potatoes are subject to a number of diseases, it is safest to buy certified seed. Purchase whole seed potatoes. Don’t use potatoes purchased at the grocery store for seeding. These are often treated with chemicals to inhibit sprouting. Planting- Potatoes are different than most other plants because instead of seeds you plant an actual potato. Cut each whole seed potato into pieces so that each piece has two or more eyes (dormant buds, from which vines will grow), and as much fleshy tuber as possible (to feed the vines in their early growth). Let the pieces dry overnight before planting them. This allows a corky layer to form which reduces the possibility of rot. Sow two weeks before the frost-free date. When planting, use the trench, scatter or container planting method. Trench Method- For this traditional method, dig an 8” deep trench (or individual holes) in light soil and
6” deep in heavy soil. Set the potato pieces cut side down 12” apart (planting too close will result in small potatoes). Space rows 24” apart. When pieces are in place, cover with soil.
Scatter Method- Some gardeners prefer to simply lay the seed potatoes right on the loosened soil and
then cover them with a few inches of mulch. You can continue adding mulch as the plants grow until you have an 18” deep covering. Since the tubers always grow above the seed piece, harvesting is simply a matter of reaching down through the mulch and removing as many potatoes as needed. The potatoes are much cleaner at harvest time than if they had been grown in soil. If you have a rodent problem this is probably not your best choice.
Container Method- This method is easy and takes up less space. Plant your seed potatoes in the
bottom of a tall container, like a clean garbage can or whiskey barrel. Make sure the container has drainage holes. Put about 6” of soil in the bottom first, then spread out your seed potatoes and cover with a few inches of soil. Keep adding soil as the plants get taller until you’ve filled your container. You can do the same thing with old tires, as you add more soil add another tire to the top until you reach the desired height. Tires can be stacked 8 levels high. At the end of the season harvest is a breeze with this method, simply dump out the container or remove the tires and gather your potatoes. Maintenance- The initial soil amending prior to planting should be enough. Potatoes don’t need an extremely rich soil. What they do rely on is a steady water supply. Water them at least an inch a week. Monitor for pests. Check for Colorado potato beetle larva and egg masses on the underside of leaves. If found remove by hand or treat with Carbaryl or Permethrin dust. Wire worms attack underground. Treat with a soil application of Permethrin. Rotating where you plant will help with this also. If plants turn black, moldy or wilt prematurely, you may have blight. If caught early you can treat with a fungicide. With blight, potatoes can still be harvested. Be sure to dispose of vines or burn, do not use for compost. Change planting location the next year. If scab is found on the potatoes, lowering the PH of the soil will help. Harvesting- New potatoes may be harvested anytime they have grown to a usable size. Begin to test potato size a week or two after flowering. You can harvest a few new potatoes without harming the plant, by gently feeling around the soil near the plant and removing the potatoes. The entire crop is ready to harvest once the tops of the plants die off. You can leave the potatoes in the ground for a few weeks longer, as long as the ground is not wet and does not freeze. Use a garden fork to lift up the entire root system. It will take some practice to avoid spearing any prize potatoes. Treat potatoes gently to avoid damage. Let dry for a few hours indoors then brush most of the dry soil from them. Store them in a dark, cool (60 degree), dry location for one to two weeks to prepare them for storage. Then transfer them to a dark storage area where they will keep for 6 to 8 months at 35 to 45 degrees, with high humidity and good, even ventilation. 2366 E. Sunnyside Rd.-Idaho Falls, ID – (208)522-4660 www.sunnysidegardens.net
MC3709 SM2963 Clinical Booklet 8/16/06 8:06 AM Page 1 CLINICAL STUDIES IN SUPPORT OF DISPOSABLE BLOOD PRESSURE CUFFS MC3709 SM2963 Clinical Booklet 8/16/06 8:06 AM Page 2 LONGITUDINAL EVALUATION OF NEONATAL NOSOCOMIAL INFECTIONS: ASSOCIATION OF INFECTION WITH BLOOD PRESSURE CUFF. Author: Martin G. Myers, M.D. Objective: The purpose of this study as documented by the author and a pediatr
Legislative Budget and Finance Committee A Performance Audit of Pennsylvania’s Medical Assistance Transportation Program for Methadone Maintenance Report Presentation by Patricia Berger, at February 9, 2011, Meeting Good morning. Senate Resolution 2010-348 directed the Legislative Budget and Finance Committee (LB&FC) to conduct a performance audit of Pennsylvania’s Medica
 Asparagus & Potatoes
  Phosphorus and potassium are essential for good potato development. We recommend using Sunnyside